Background

Showing posts with label spray paint. Show all posts

Saturday, April 28, 2012

Lamp Makeover

Hi There. Yep, I'm back. This is my second post today. If you missed my earlier post, please feel free to check it out here. It's just a little story about me and the Mr. Not only is this my second post today, but it's also my 100th post!!

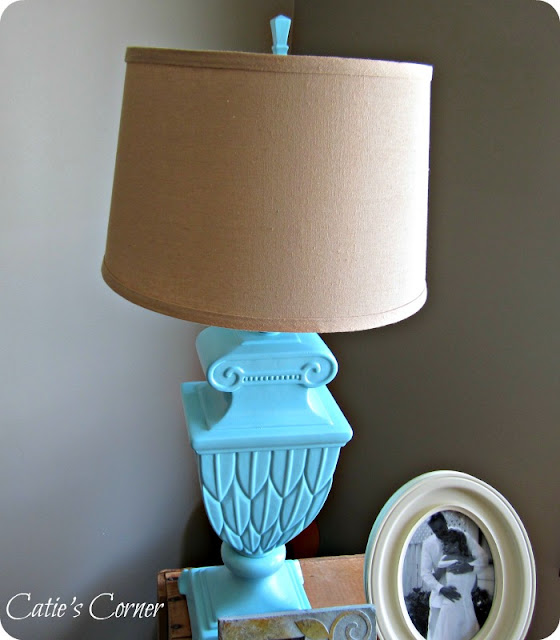
This one's about a little makeover I recently did on a lamp that I hated! Unfortunately I have no before picture to show you. I was having issues with my camera and couldn't take one. But yay for me, I got a new camera the other day and am pleased to be sharing the after pictures. Those are the best ones to share anyway. Right? I'll give you a visual of what the lamp looked like before, to help you see how far its come. I think it was supposed to be done in a shabby chic style, but it did not deliver! It was dirty white, over dirty gold. It was sanded a bit so you could see some of the gold. My description makes it sound better looking than it actually was. Wanna see the after. It's definitely a statement piece in the living room now!


Isn't she pretty?? I love the color! 


I started with two coats of Krylon primer. Then did about four coats of Krylon Blue Ocean Breeze. And finished her off with a few coats of Krylon Clear Gloss. I'm not overly please with the gloss paint and may end up spraying on a couple more coasts. I'd like her to be really glossy! And after she was all finished I noticed some rough patches. I guess I should have sanded her down a bit before I started painting. Oh well, live and learn. Not everything has to be perfect, right? Here's a few more pics for your viewing pleasure.  =) 


So what do you think? Nice? The lamp shade I found at GW last year for $4. I wish there would have been more than one. I really like the linen look to it, especially when the lamp is on. Since I painted her, the pattern on the body is much more noticeable. Before you couldn't really tell there was one. Now it kind of looks like feathers or leaves. Love it! Overall I'm happy with how it turned out. Not too bad for my first spray painted lamp. I would definitely do it again. And the color, I'm gaga for the color!! It's the new accent color in my living room. I order some super cute zig zag patterned cushions cover from Avon and they should arrive next week. They have the same blue/aqua color on them. Don't worry, I'll share some pics once I get them.

Well, I'm off. Got to get out and enjoy the rest of the day. What are you up to this weekend? 


Sharing With:

Thursday, July 21, 2011

A Table for the Mr .

Hey All! After my post the other day about my cutie retro table, I was on the hunt for a side table that had a similar type of feel for Mr. CC's side of the bed. You may remember we used to have these night tables - wood, wicker, dark and a bit heavy looking compared to my new girl. My search on Kijiji paid off! I mentioned in that last post that I had found a small round brass bamboo table with a marble top and was waiting to hear back from the seller. Well I did hear back from her and boy was I happy. I picked it up and hit the Depot for another can of heirloom white to pretty it up.

Here's the so, so before. I guess it's not soo bad if you're into brass.


After one coat of paint. We're gettin' there. 


And after two coats of paint, the after!! 


Isn't it cool? I think the marble is a bit more masculine for Mr. CC's side of the bed. What do you think? The only thing I didn't like was how the cords hung down in the back. So I got tricky and used two twisties to secure them to the leg of the table. Yeah, sometimes I'm tricky like that! : )  


Did you notice the silver tray on the bottom? It makes a great addition to the table. Of course it was a GW find I picked up for $1. It used to look like this before I sprayed it silver. Retro/vintage cute, but not my colors. Too dark.
I'm soo pleased with how our bedroom is FINALLY starting to come together. It's only taken 11 1/2 years. Next up will be new lampshades. Today while I was at Home Depot I bought two harps for them. They don't have them and it's made finding new shades nearly impossible. There aren't many nice lampshades that slip onto the lightbulb. I'm most likely gonna get drum shades. Love those!

And here's a quick transformation of my jewellery tree that sits on my dresser. Since I was already spray painting I figured I might as well get it done too. I've been meaning to do it for a while now and I love how it turned out. You'll have to check back to see how it looks in my room.  : )



** Mr. CC is on holidays too, so once again I missed the good morning light! I should've kicked him out of bed so I could've gotten some better shots.  : )
Partyin' With: 
Shaunna @ Perfectly Imperfect's DIY Furniture Makeovers
Vanessa & Heather At The Picket Fence's Inspiration Friday
Courtney @ French Country Cottage's Feathered Nest Friday
Kim @ Savvy Southern Style's Wow Us Wednesdays
Sarah @ A Beach Cottage's Good Life Wednesday
Wendy @ The Shabby Nest's Frugal Friday
Gina @ The Shabby Creek Cottage's Transformation Thursday

SAS Interiors

Tuesday, July 19, 2011

Retro Table : )

This past Saturday we were actually up early enough to hit some garage sales, and by early I mean we were out the door just before 10 am. I LOVE garage sales!! I've found some pretty cute things over the years. And I love the surprise of what I'll find, because you never know. We only stopped at a handful but boy did I find some good stuff. I'll have to share my cutie vintage Pyrex pieces I got in another post.

This psot is all about my metal retro table I scored for $5! As soon as I saw her (yes she is a girl) I knew she was coming home with me. Although I had no idea where she'd actually live at my house. You see, I'm one of those people who will pass on something if I can't think of where it will go. I HATE clutter and am the exact opposite of a hoarder. I am constantly purging stuff out of my house. Sure there's been a couple times I've thought, why did I get rid of that, but overall I love the feeling of no clutter. Ahhh....

Here she is all dirty and needing a fresh coat of paint. 


Cute, huh?  : )


$5 people!! Check out the top. LOVE!!


Nice magazine holder at the bottom. Well at least that's what I thought I'd use it for. 

I took the palm sander to her. She had some spots that had a bit of rust. Then I washed her off really well and started spray painting. This was my first time using the infamous Rustoleum Heirloom White. Yes, I was a Heirloom virgin.  : )  I loved how it turned out. I'd used a cream color by Krylon before, but it was a little too yellow for my liking. The Heirloom White is just right. 


Wow! 

Once she was dry I brought her into the house and started trying to figure out where she should go. It turned out she was too small to go in the living room so I tried her in my room. I took out my old night table and moved her in. Oh she looks soo cute in there and goes fabulous with my bedding. I LOVE my bedding by the way!! Can you believe I got it from Avon? Yes ladies, Avon! I know. You can see a better pic of it here


What do you think? Cute, right? Of course by the time I got around to taking pics the morning sun was gone. When will I learn? These pictures are terrible. Sorry! I'm gonna be taking some new pics, really.


So just the other day I was on Pinterest  and came across a pic of some Pottery Barn lamps that look just like mine! Only they're A LOT pricier. I'll be doing a little post about that once I get some new shades.


Look at the top. Isn't it lovely? And there's my nightly moisturizing basket. It's very dry here so I lotion up my hands and use lip balm before I go to bed. Just a little personal info for ya.  : )  Now I'm on the hunt for a complimentary side table for Mr. CC. I did fine a round brass bamboo one with a marble top on Kijiji. I'm waiting to hear back from the lady if she'll take what I offered. She's asking $35 and I think that's a bit much. I know, I'm a cheap skate. heehee  If I do get it I'll be spraying it with the heirloom too and sharing it with you. 

You all have a great day! I'm on holidays all week, so I'm off to enjoy the outdoors and my cozy sunroom.  : ) 


Partyin' with:
Sarah @ Thrifty Decor Chick's Before & After Party
Roeshel @ The DIY Showoff's Project Parade
Donna@ Funky Junk Interiors' Sat. Nite Special
Kim @ Savvy Southern Style's Wow Us Wednesdays
Sarah @ A Beach Cottage's Good Life Wednesday
Gina @ The Shabby Creek Cottage's Transformation Thursday
Shaunna @ Perfectly Imperfect's DIY Furniture Makeovers
Heather & Vanessa At The Picket Fence's Inspiration Friday
Courtney @ French Country Cottage's Feathered Nest Friday
Wendy @ The Shabby Nest's Frugal Friday

SAS Interiors

Friday, June 17, 2011

Earring Hanger

Good Friday to you! I'm happy because today is kinda like my Saturday. I just work Monday - Thursday and I love it. So today I'm sharing a little diy project I did a month or so ago and I just got around to taking pictures of it this morning. I know, I should be more on it when I do these things. Obviously there won't be any before picture, only the after. You'll like it though. I promise. 

The whole reason I thought of doing this project was because I've had two jewellery parties in the last year and have accumulated A LOT of it. I have somewhere to hang my necklaces, but now nowhere to hang my earrings and it was driving me nuts. So I dug out an old black frame that had been sitting in my hall closet for a while and started hot gluing. First I cut some thin wire to the perfect length I'd need. Then I just hot glued it to the back. I actually didn't even measure to make sure it was even, I just eye-balled it. After that I took it outside and gave it a few coats of Krylon's silver spray paint and that was it. I know, really hard! So here it it, minus a couple pairs of earrings. Oh, and that's not even all my earrings. This just holds the ones with hooks! Yeah, I probably have to many.


Look at that "diamond" at the top sparkle! lol
Now here's a couple pictures of the back. Just like my sunburst mirror, she isn't pretty from the behind. 

I think pretty good spacing for eye-balling it.  ; )
And there you have it, my new earring holder. Sorry my pictures aren't the greatest. I try. haha Have you made anything like this? If so, pass on the link and I'll take a look! Have yourself a fantastic Friday!!


Linking to:

Monday, May 23, 2011

DIY Sunburst Mirror


Ok, so I did it. After months of drooling over other's DIY sunburst mirrors I finally decided to make one myself. Fortunately for me I had the perfect little round mirror to start with. I've seen other blogs where they used a mirror and embroidery hoop as the "base" of the project, but I didn't have to worry about that. My mirror was gold to begin with and the back is just like a frame, it comes off and the mirror comes right out. (I was too anxious to get started and didn't even think to take before pictures. heehee)

I started with a package of 100 kabob skewers and a hot glue gun. First I glued on the N, S, E, W sticks and then I went from there. With a pink marker I'd mark the length on a bunch of sticks to make sure they were going on at the same length. After a while I found I was repositioning them and it didn't really matter if they were marked or not, but it did help at the beginning, so I would recommend doing it. For the shorter sticks, I had to break a couple inches or more off so they weren't overlapping. I was amazed how the sticks kept adding up and adding up. After using the entire package I had to dip into an already opened one I had already. There are over 100 hundred skewers on there!! To hang it I doubled up a piece of wire and glued it on the back. Lastly I spray painted it with Krylon's silver.

She ain't pretty from the back!!
See the pink marks?

And the big revel. Drum roll please.....
LOVE!!!!!


Isn't she gorgeous??? I'm in love, for real. Is it wrong to love a mirror? In this case, I think no. I can't believe how well it turned out. Our bedroom is slowly coming together and this baby just made the biggest impact on the overall look. Did you check out my cute Goodwill lamps and my scrapbook paper in Dollarama frames? I still need to do something with the lampshades. I'm not liking them at all. They're ok when their turned on, but not soo pretty when they're off. I'm thinking of covering them with a nice fabric or looking for some drum shades to replace them. What do you think??


* I thought I'd add, this mirror only cost me $6 to make. That's right! I had the mirror, so that cost nada. The sticks were a buck and $5 for the spray paint. Now that's what I call DIY on the cheap. Nice! Just wanted to share.  : )

** The side tables in this room have been changed. If you'd like a peek at the new cuties I redid click here and here
Linking to:


Related Posts Plugin for WordPress, Blogger...