Background

Showing posts with label before and after. Show all posts

Sunday, January 27, 2013

Organized Lunch Containers Drawer

Do you have a drawer or cabinet dedicated to lunch containers? I had a drawer and 
 it was not functioning as well as it could've been. Have a look.


There was too much crammed in there!

The first thing I did was take everything out. I found a new home for, not two but three, lunch bags on top of the fridge. They now live in a pretty shiny chrome basket. Then I got to reorganizing. One of my favorite things to do! Really, it is.

And here is the beautifully organized after!

Much better, huh?

Let's take a closer look.


 Side note: How the heck do you pluralize the word thermos???


Don't you love it? I sure do! Now that I can finally see everything, it'll make finding what I need in the morning soo much easier.

Here's a little before & after shot for your viewing pleasure. 


Have you done a post on your lunch container drawer or cabinet? If so, I would love to see it! Please leave the link to your post in the comments. 

Thanks for joining me today!
**Sorry for the terrible nighttime pictures!

Sharing With:

My Uncommon Slice of Suburbia

Wednesday, November 2, 2011

Blanket Makeover - Sort Of

Hi There. Hope you all had a happy Halloween and your kiddies got lots of treats. We had lots of fun trick-or-treating with some of our friends. Miss A was a fairy, again. There was also a Lalaloopsy, zombie pirate, Luigi, and the Stay Puft marshmallow man in our gang. His costume actually had a tiny fan in the back that kept him puffed up. It was hilarious!


Sorry the picture's soo tiny. Of course I forgot my camera, this pic was taken with my friend's iPhone. Anyway, everyone had lots of fun until we all got too cold. Notice Miss A has mitts on. Yeah, they're snow gloves and her fingers still got cold. She also ended up with her coat on. But hey, can't complain, there could've been a foot of snow on the ground. Check out the green grass behind them - snow free! 

Now onto my blanket makeover of sorts. Years ago I found a gorgeous quilted silk throw blanket on clearance at Home Sense and had to get it. I loved it! Then Miss A came along and let's just say when she was a baby she ate like a puppy. And we all know what usually happens when puppies eat too much, too fast. Well my blanket got washed and dried and washed and dried. Eventually the seams started coming undone and it didnt' look soo pretty anymore. I never had the heart to get rid of it and kept it for the last five years, knowing that some day I would find a way to repurpose it. About a month or so ago that day finally came. A light bulb went off and I got the idea to turn it into a throw pillow for our bed. 

That once lovely blanket turned from this, 


to this! 


Isn't it nice? I'm really pleased with it. I made an envelope cushion cover and used a pillow from a sleeping bag to fill it. Then I got out my scissors and hot glue gun and made rosette after rosette. I really, really like rosettes! Don't be surprised if my next post has something to do with them too.  ; )
After they were all made I had a tough time deciding how to place them on the pillow. I tried a zillion different ways, before I came to this. Instead of stitching them on I just used my hot glue gun to attach them. This pillow is only for looks, so I'm not too worried about it getting washed. Although, I'm pretty sure hot glue doesn't wash off easily. Never tested that, but I have a feeling. Anyhoo, once they were all glued on I added the pearls to the centers and viola! I had everything I needed to make this pillow, so the cost of this project was $0. LOVE that!

Here's a few close-ups for your viewing pleasure.


What about you, have you made a pillow out of something that your couldn't bare to part with? Maybe an old sweater, t-shirt or baby blanket? Do share. Thanks for stopping by!

Click here to enter my giveaway!! 

Sharing With:

Monday, October 24, 2011

Let The Sun Shine In!!

We have lived in our house for just over six years now. Since the day we moved in one thing has really bothered me. What could it be, you might be wondering? Well I'll tell ya. A huge, hideous, plastic yellow awning that was over our front window. The thing was sooo ugly and it kept the living room a bit dim for most of the day. I have wanted it down since day one, but the months and years flew by and it was never really at the top of the list. Not to mention we didn't seem to have the right sized tool for the job. We had the size up or the size down, but some how the one we needed had been misplaced. I'm blaming Mr. CC. He kind of has a habit of using things and not put them back where he got them when we're done!   >: (  I'm sure you know someone like that too?

Anyway, a few weeks ago I was in the laundry room doing, well laundry, and happened to notice a little teeny tiny wrench sitting on a shelf. As soon as I saw it I knew it was "the one" I'd been looking for!! I was soo excited I immediately ran to the garage and grabbed the ladder and headed out front. Now keep in mind I live in Canada which means we have a basement and you have to go up five or six steps to our front door. This means that the awning was quite high and my ladder wouldn't reach from the ground. This is where the raised flower bed, that I detest, came in quite handy. I put the ladder in there so I could reach. I didn't open it, I just leaned it against the side of the house. Then I got to the unscrewing. There wasn't that many screws, but there was the problem of the ones in the middle, I couldn't reach them. Doh!! What to do? I ended up unscrewing a few screws on the frame of the awning that attached to the awning itself. Then I bent the frame inward so they folded in and I pushed the whole thing in toward the window. Are you still with me?? Maybe I should have taken some video.  haha  So are you ready for the amazing before and after?

 Does it get any uglier? YUCK!

 Gorgeous!! Although now you can see that at some point the trim used to be light blue. Our house
desperately needs to be painted, but we rent and won't be paying for that. You can see the raised 
flower bed where my ladder went. I'm sure if any neighbors were watching they
thought I was crazy. I just wanted it down and didn't need a man to do it! 
 And one side by side for ya. It looks a zillion times better!! 

Much better, don'tcha think? I am soo happy it's finally down. The living room is much brighter now. And in the winter the extra sunlight will help keep the room warmer. Also, for the record, over the years Mr. CC kept saying the awning wasn't soo bad and didn't know why I wanted it down soo badly. After I took it down he came out and couldn't believe how much better it looked. Once again, he should've listened to me. I'm always right!! lol  Oh, he also said it was just coming out to take it down, but I'd already done it. Yay, me! I love doing a "man's" job.  =)
Sharing With:

Tuesday, September 27, 2011

Simple Solution

Hey there ladies & possibly gentlemen.  = )  Today I have a quick post for ya. This one was spurred by my annoyance at the jumbled mess that was living in a drawer in the bathroom. Do any of you have a drawer that looks like this???

Terrible, isn't it? Just looking at it nearly gives me hives. I am all about organization in my house and this was completely unacceptable. Every time someone pulled out one headband, several more came along for the ride. Not to mention you can't really see what's in there. Argh, it was buggin' me!! So I put on my thinking cap. How could I organize these and not spend a dime?? Think, think, think...

Ahh haa , I got it! Old pop bottles! I'm sure you're thinking, old pop bottles? What could she be thinking? Well , I'll show you. Take the label off two bottles, then cut the top off. After that try and wedge them into the drawer horizontally. You may have to trim a little more off the top. Only cut off a teeny tiny bit. If you cut off too much your bottle will just slide right to the bottom. You don't want it to sit at the bottom, so please trim carefully . Don't say I didn't warn you.   : )

Are you ready for the after?!?! It's kind of exciting! 

Tada!!

Are you as impressed as I am? It's gorgeously organized!! 

Here's a side by side for you, just to see how much better it really looks. 

What do you think? Are you going to try this? Please, let me know if you do. I am soo happy with how it turned out. No more mess and it's much easier to get a headband out now. Toodles!  = ) 
Sharing With:
  

Monday, August 8, 2011

I did it!!


Hey All! Hope you had a great weekend. Mine was really good. Well , other than the insane storm that blew through Friday night. I accomplished a first Saturday - I painted my very first piece of furniture EVER!! Of course I've spray painted lots of things, but this was my first time using "real" paint. I will admit, I was a little intimidated by the thought of it. Thanks to all of you out in blogland who paint furniture and share it on your blog , I found the courage to try.  : )

Fortunately for me the piece I wanted to paint required pretty much no sanding. I was painting the dresser in Miss E's room. It's from Ikea and it used to be mine years back. The dresser is 11 years old and still in great shape. LOVE Ikea! The wood was plain Jane and just screaming to be prettied up.


See what I mean? Plain Jane! Oh yeah, I forgot to take a pic with the knobs still on. I started with a light sanding to the top only. After that I wiped the whole thing down and started on my first coat. I used a 4" foam roller brush for the large parts and a 1" foam brush for the thin parts. I did two coats Saturday and the final coat Sunday morning. I thought it'd be best with a third coat, since I didn't use any primer. I've got my fingers crossed I don't regret that.  : )  The results are fabulous! I'm loving it and so is Miss E. She was out of town when I did it, so it was a surprise when she came home yesterday. Soo glad she liked the color. Phew! All right, no more stalling. Here's the beautiful after!


So what do you think? Can you tell it's the same color as the shelf and chairs in the sunroom? The color is so soothing. We're still undecided what to do with the knobs. I could paint them to match, leave them as is or spray paint them with an oiled bronze color. Her desk has bronze knobs and she really likes them. Decisions, decisions. Oh, and there's still a lot of paint left which has got me thinking about painting my desk now. Hmm...

Since we all love 'em, here's another look of the B & F for ya! 


So nice!! 

What were you up to this weekend? Get any projects done around the house? I think I might have caught the painting bug!!

Sharing At: 

Monday, July 25, 2011

Changes in the Sunroom

Hi There. Many of you have already seen our garage turned sunroom. Well, this past week while I was on holidays, or staycation if you will, I added a few new accessories. The first was a shelf above the TV. This is what it looked like before.


Not to shabby for a room that was once a garage! Don'tcha think? : )  Well, I wanted more room to display things. So up with the shelf. It was one that we'd had sitting in the actual garage side of our garage. It needed some serious help and only stayed up for a few days before I took it 
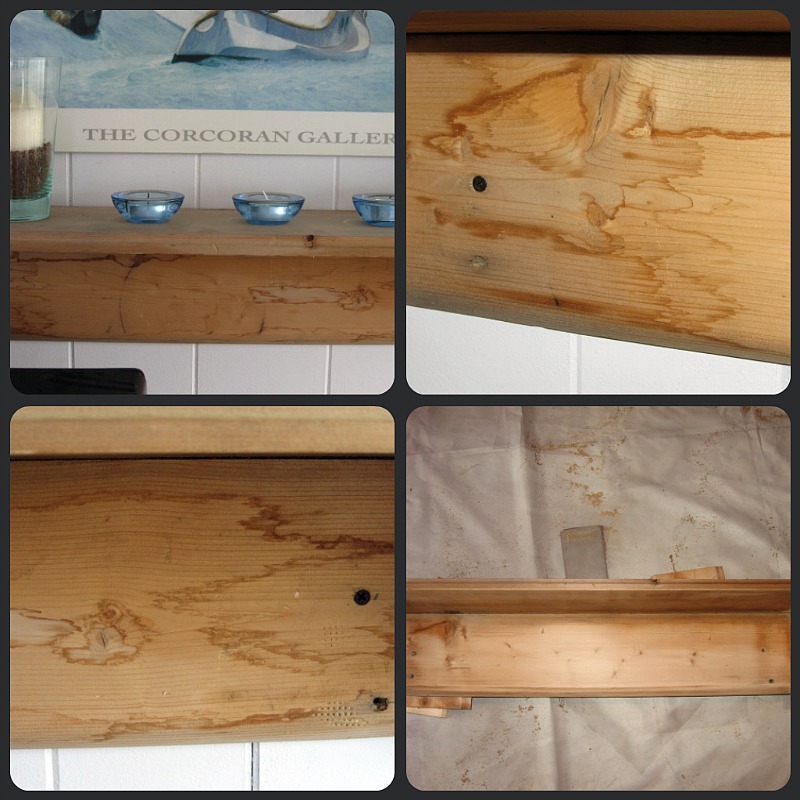
down to give it a fresh coat of paint. Here's what it looked like before. 


Lots of water stains and some sort of mark that resembled the bottom of a paint can. 


Kinda gross, huh? 


So I took it down, sanded, and started painting. This was after the first coat. It already looks
a zillion times better! I used the same paint that we used on the folding wooden chairs in the room.
Last night I did the second coat to finish it. This afternoon I sanded it a bit to give it a
shabby, beach cottage look. And here it is now. 


Much better! Did you notice the addition of my new bird on the right? Love it! $5 at a thrift
store. I've seen similar ones at Pottery Barn, they started a $25 for a small one! And I
have to say, mine is better looking. : )


There's a couple new pieces I put up on the wall. On the right, a basket I picked up for $1 at a thrift store. Under that is a paper umbrella in a nice dark aqua color. On the left I hung my textured bag, and the little boat used to be on the right. The other walls got some new accessories too. Where the textured bag used to be is now home to four cooper cookies cutters in sea life shapes. They were a gift from my mom years ago. I love them and a can't wait for the copper to get all weathered looking.  : )


The little boat hangs above the love seat that's on the right. That was a Kijiji find for $5. It's soo cute! 
I'm still not quite sure what I want in it, but the shells are ok for now. The little bottle has sand in it from the British Virgin Islands. It was a gift from Ms. E's mom, Ms. J, after she'd taken a trip there. 


One last look. I'm really happy with all the little changes I've made. Sometimes I can't believe I'm outside when I'm in there. It's soo cozy and homey. We just love it! So what do you think of the shelf addition?

If you'd like a look at the entire sunroom please click here

Sharing with:
Michele @ Primp's Primp Your Stuff Wednesday
Kim @ Savvy Southern Style's Wow Us Wednesdays
Sarah @ A Beach Cottage's Good Life Wednesday
Debbie @ Debbiedoo's Newbie Party
Gina @  The Shabby Creek Cottage's Transformation Thursday
DaNita @ Delightful Order's Delightfully Inspiring Thursday
Shaunna @ Perfectly Imperfect's DIY Furniture Makeovers
Courtney @ French Country Cottage's Feathered Nest Friday
Vanessa & Heather At The Picket Fence's Inspiration Friday
Wendy @  The Shabby Nest's Frugal Friday
Jenn & Jenna w/ Saturday Spotlight

Thursday, July 21, 2011

A Table for the Mr .

Hey All! After my post the other day about my cutie retro table, I was on the hunt for a side table that had a similar type of feel for Mr. CC's side of the bed. You may remember we used to have these night tables - wood, wicker, dark and a bit heavy looking compared to my new girl. My search on Kijiji paid off! I mentioned in that last post that I had found a small round brass bamboo table with a marble top and was waiting to hear back from the seller. Well I did hear back from her and boy was I happy. I picked it up and hit the Depot for another can of heirloom white to pretty it up.

Here's the so, so before. I guess it's not soo bad if you're into brass.


After one coat of paint. We're gettin' there. 


And after two coats of paint, the after!! 


Isn't it cool? I think the marble is a bit more masculine for Mr. CC's side of the bed. What do you think? The only thing I didn't like was how the cords hung down in the back. So I got tricky and used two twisties to secure them to the leg of the table. Yeah, sometimes I'm tricky like that! : )  


Did you notice the silver tray on the bottom? It makes a great addition to the table. Of course it was a GW find I picked up for $1. It used to look like this before I sprayed it silver. Retro/vintage cute, but not my colors. Too dark.
I'm soo pleased with how our bedroom is FINALLY starting to come together. It's only taken 11 1/2 years. Next up will be new lampshades. Today while I was at Home Depot I bought two harps for them. They don't have them and it's made finding new shades nearly impossible. There aren't many nice lampshades that slip onto the lightbulb. I'm most likely gonna get drum shades. Love those!

And here's a quick transformation of my jewellery tree that sits on my dresser. Since I was already spray painting I figured I might as well get it done too. I've been meaning to do it for a while now and I love how it turned out. You'll have to check back to see how it looks in my room.  : )


** Mr. CC is on holidays too, so once again I missed the good morning light! I should've kicked him out of bed so I could've gotten some better shots.  : )
Partyin' With: 
Shaunna @ Perfectly Imperfect's DIY Furniture Makeovers
Vanessa & Heather At The Picket Fence's Inspiration Friday
Courtney @ French Country Cottage's Feathered Nest Friday
Kim @ Savvy Southern Style's Wow Us Wednesdays
Sarah @ A Beach Cottage's Good Life Wednesday
Wendy @ The Shabby Nest's Frugal Friday
Gina @ The Shabby Creek Cottage's Transformation Thursday

SAS Interiors
Related Posts Plugin for WordPress, Blogger...