Background

Sunday, October 30, 2011

Candy Corn Sugar Cookies

Happy Sunday all! I'm here with another baking recipe for ya. I came across a picture of these cookies on Pinterest (shocker!) and knew I had to make them. They are perfect for Halloween - candy corn sugar cookies. I have to say, these are by far, the cutest cookies I've ever seen! I love candy corn and it just makes me smile to see a candy corn cookie.  =)


See, cute! I bet you're smiling now too. Now I will admit these cookies were a bit labor intensive. You see I don't have a Kitchen Aid mixer or any stand-up mixer for that matter. Which meant I had to mix in the coloring by hand. I thought my shoulder was going to need ice yesterday afternoon. For reals! My right shoulder was aching while I stirred in the yellow and then the red food coloring. If you have a mixer these will be so easy for you to make. Here's a look at the process.


After my dough was made I divided it into thirds. The first third I left white and put into a plastic wrap lined loaf pan. See picture above. I patted it as flat as I could. Then I mixed the yellow dye into the remaining two thirds and added half of the yellow to the pan. The last of the yellow dough got some red coloring mixed in to turn it orange. Oh, by this point I was ready to quite! It seemed like it took forever to get that dough orange enough. But I suffered through and the middle pic above is what the dough looked like all flattened together.

I let it chill in the fridge for about 6 or 7 hours. You could let it chill overnight if you wanted. I would recommend chilling it at least 4 hours. You want it to be nice and firm once you start slicing. Make your slices about 1/4". Then just angle your knife to cut out candy corn shapes. See picture above. That's all there is to it. Like I said, if you have a mixer this will be super easy.

Here's the best recipe I've found for sugar cookies. It's from All Recipes and makes soft and chewy cookies or you could bake them a couple minutes longer if you like yours crispier. 

Ingredients
1 1/2 cups butter, softened
2 cups white sugar
4 eggs
1 teaspoon vanilla extract
5 cups all-purpose flour
2 teaspoons baking powder
1 teaspoon salt

Directions

  1. In a large bowl, cream together butter and sugar until smooth. Beat in eggs and vanilla. Stir in the flour, baking powder, and salt. Cover, and chill dough for at least one hour (or overnight).
  2. Preheat oven to 400 degrees F (200 degrees C). Roll out dough on floured surface 1/4 to 1/2 inch thick. Cut into shapes with any cookie cutter. Place cookies 1 inch apart on ungreased cookie sheets.
   3.  Bake 6 to 8 minutes in preheated oven. Cool completely.

** FYI - I only made half a recipe. I got probably 100 or more candy corn cookies out of it. 

This morning while taking pictures of these little cuties, I thought you could easily use different colors in the dough and round out the pointy parts to make more of an egg shape for Easter cookies. I will definitely be doing that. Wouldn't they look great with pink, yellow and white? Or purple, white and blue? Or, you could color every dough third a different color and have green, yellow and pink eggs. Oh the possibilities are endless. Just try these for now.  : )

Sharing With:
The Pinterest Challenge at Bower Power & Young House Love

Saturday, October 29, 2011

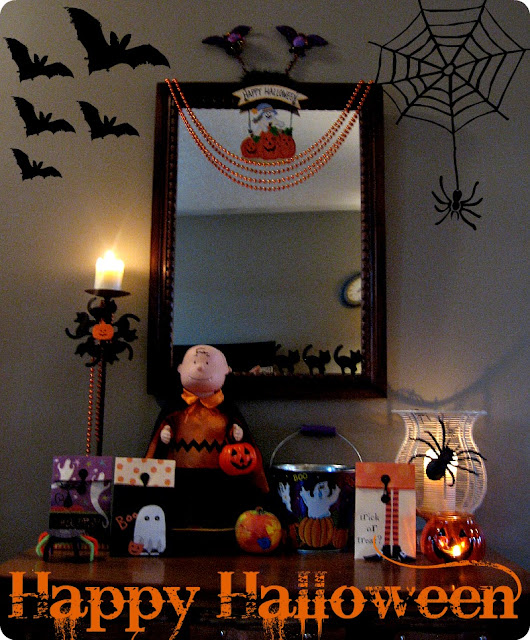
Halloween in da House

Happy Halloween weekend!! 
Hope you're all have a good one. Any partyin' going on?   

I realized last night that I hadn't showed you the Halloween 
decorations I'd put up the first weekend of October. I 
don't do a lot of decorating. I shared the Halloween 
wreath I made for our front door here
Other than that, I hang pumpkin lights in the front window
and our entryway gets a little decorated. 
Have a peek.  

The bats and spider web were added in 
Picnik. I had lots of fun editing the 
pics for this post.  : )  

Don't you love the lightening? Very cool!! 

I like how the candle light cast shadows of the little 
spiders on the wall. Oooohhh...

I just love Charlie Brown and the Great Pumpkin. Reminds
me of being a kid. I've had Charlie here for 12 years. 
When you push the button on the base he dances to the Charlie
Brown theme song. Very cute! 

These are the cutest goodie bags I've ever seen. I found them at Winner's last year. 

That's it. Told ya I don't decorate much. It's cute though. 
I know lots of people love the evil gory stuff 
at Halloween, but not me. I like the cute little
ghosts and pumpkins. 

Have a very happy and safe rest of the weekend! I'll
be back tomorrow to share the cutest cookies
ever made. I know that's a pretty 
big claim, but after you see them I'm sure
you'll agree. If you follow me on facebook you've
already seen a sneak peek.  : )  Hmm, maybe
you should head on over and follow me on facebook
to check them out. 

Sharing With:

Wednesday, October 26, 2011

Creamy Chicken & Rice Soup w/ Sweet Potato Biscuits

Yesterday was a "soup day". Miss A is the sick one now, and has missed a few days of school this week. She even cried this morning about missing library day today. Poor girl! I'm really hoping she'll make it to school tomorrow. They're having a Halloween party and get to wear their costumes. She's been excited about it since the notice was sent home last week. I'd really hate her to miss out.

Last night I thought a little homemade goodness was in order and would do us all some good. I whipped up a batch of creamy chicken and rice soup and tried out a new recipe for sweet potato biscuits I'd seen on my blogging buddy Jo-Anna's blog, A Pretty Life in the Suburbs. If you haven't visited before, you should! She has tons of amazing recipes, lots of great diy's and decorating posts too. Not to mention professional quality photos. All in all a fabulous blog!

I should share that I've never actually made creamy chicken and rice soup. It just kind of came to me and I know what I like, so I just winged-it and it turned out soooo yummy!! And guess what? I actually measured the ingredients. Amazing, I know.  : )

Once again the photo quality is lacking, sorry. It's hard to get a
decent shot around dinner time, the lighting is no good.

Catie's Creamy Chicken & Rice Soup
serves 4 (2 scoops each)

2 chicken breasts, chopped into bite size pieces
1 large carrots, chopped into pea sized pieces
1/2 large onion, finely chopped
1/2 tsp or one clove garlic
2 tsp Mrs. Dash (original)
1 can cream of mushroom soup
2 tsp chicken stock bullion
2 cups water
(Or you could use 2 cups of liquid chicken stock instead of bullion and water.)
1 cup milk
1 1/2 cups cooked rice (You could use 2 cups, but I had 1 1/2 of cooked rice already in the fridge.)
3/4 cup peas (I used frozen.)
1 - 2 tbs oil, for cooking chicken and veggies

  • Put oil in a large pot on medium heat. Once pot is warm, add chicken and cook for about 5 - 7 minutes. 
  • Add the carrots, onion, garlic and Mrs. Dash. Cook until the onion is soft. 
  • Next add the soup, bullion, water, rice and peas. Bring to a simmer. 
  • Cook at least 15 - 20 minutes to ensure chicken is fully cooked. 
That's it! I let mine cook for about 45 minutes so it thickened up more. But if you're in a hurry you could have this soup made in 1/2 an hour.

While the soup was cooking I made up the biscuits. OMG were they delicious!! I had one with my breakfast this morning with a little butter and honey. Wow! It was like a scone. And really, isn't a scone just a fancied up word for biscuit??  =)

Look at that flaky deliciousness!! I may have to eat one right now. Am I joking? Maybe, maybe not.  


Here's the recipe from Jo-Anna's blog A Pretty Life in the Suburbs. You really should check it out!

Sweet Potato Biscuits
Makes 8 biscuits  (I got 12 out of the dough. Maybe mine were smaller?) 
1 3/4 cup flour
2 tbsp brown sugar
2 1/2 tsp baking powder
1/2 tsp salt
1/2 tsp baking soda
6 tbsp chilled butter, cut into pieces
3/4 cup sweet potato puree
1/3 cup buttermilk

  • Whisk together flour, sugar, baking powder, salt and baking soda.
  • Using a pastry cutter, cut in the chilled butter, until it looks like coarse meal, with some pea sized butter pieces remaining.
  • In a separate bowl, combine the sweet potato puree and buttermilk.
  • Then add the sweet potato/buttermilk mixture to the flour.
  • Stir with a fork, but don't over mix.  
  • Then turn the dough out onto a floured surface, and knead into a ball.  It is supposed to be lumpy - that's what makes them so buttery and crumbly!
  • Then flatten the ball into a disc shape, about 1 inch thick.  The disc should be big enough to get 8 biscuits cut out of it.
  • Using a biscuit cutter or some other circle shape (like a cup), cut out 8 biscuits.  Make sure to use all the dough.
  • In a preheated 425 degree oven, bake for 20-25 minutes, rotating the pan half way through baking.
Tips!
  • I bet you could use pumpkin or butternut squash puree with this recipe!  The perfect fall treat!
Catie's Tidbits 

  • In the afternoon I cooked one sweet potato in the microwave for 6 minutes. Then mashed it up and added about 1/4 - 1/3 cup of water to thin it out a bit. It was exactly 3/4 of a cup and worked perfectly. I let it sit in the fridge until I was ready to make the biscuits. 
  • I also added about 1 tbs of cold water to the dough. I found it a bit too dry. It helped bind it all together better.
  • Lastly, do not be afraid to knead the dough. I probably did about 10 times or so and they turned out incredibly flakey. You could peel the layers apart. 

Thanks soo much for stopping by today. Hope the rest of your week goes well! Cheerio peeps!!  : )  
Sharing With:


Monday, October 24, 2011

Let The Sun Shine In!!

We have lived in our house for just over six years now. Since the day we moved in one thing has really bothered me. What could it be, you might be wondering? Well I'll tell ya. A huge, hideous, plastic yellow awning that was over our front window. The thing was sooo ugly and it kept the living room a bit dim for most of the day. I have wanted it down since day one, but the months and years flew by and it was never really at the top of the list. Not to mention we didn't seem to have the right sized tool for the job. We had the size up or the size down, but some how the one we needed had been misplaced. I'm blaming Mr. CC. He kind of has a habit of using things and not put them back where he got them when we're done!   >: (  I'm sure you know someone like that too?

Anyway, a few weeks ago I was in the laundry room doing, well laundry, and happened to notice a little teeny tiny wrench sitting on a shelf. As soon as I saw it I knew it was "the one" I'd been looking for!! I was soo excited I immediately ran to the garage and grabbed the ladder and headed out front. Now keep in mind I live in Canada which means we have a basement and you have to go up five or six steps to our front door. This means that the awning was quite high and my ladder wouldn't reach from the ground. This is where the raised flower bed, that I detest, came in quite handy. I put the ladder in there so I could reach. I didn't open it, I just leaned it against the side of the house. Then I got to the unscrewing. There wasn't that many screws, but there was the problem of the ones in the middle, I couldn't reach them. Doh!! What to do? I ended up unscrewing a few screws on the frame of the awning that attached to the awning itself. Then I bent the frame inward so they folded in and I pushed the whole thing in toward the window. Are you still with me?? Maybe I should have taken some video.  haha  So are you ready for the amazing before and after?

 Does it get any uglier? YUCK!

 Gorgeous!! Although now you can see that at some point the trim used to be light blue. Our house
desperately needs to be painted, but we rent and won't be paying for that. You can see the raised 
flower bed where my ladder went. I'm sure if any neighbors were watching they
thought I was crazy. I just wanted it down and didn't need a man to do it! 
 And one side by side for ya. It looks a zillion times better!! 

Much better, don'tcha think? I am soo happy it's finally down. The living room is much brighter now. And in the winter the extra sunlight will help keep the room warmer. Also, for the record, over the years Mr. CC kept saying the awning wasn't soo bad and didn't know why I wanted it down soo badly. After I took it down he came out and couldn't believe how much better it looked. Once again, he should've listened to me. I'm always right!! lol  Oh, he also said it was just coming out to take it down, but I'd already done it. Yay, me! I love doing a "man's" job.  =)
Sharing With:

Friday, October 14, 2011

Hi Strangers!

Wow, it's been nearly a week since my last post! I had just planned to take a couple days off over the long weekend. Well then I ended up getting Miss A's cold, which soon turned into a lovely sinus infection. Yuck!! Needless to say, with my head and face hurting from sinus pressure, the last thing I want to be doing is sitting at a desk, looking a at computer monitor. So Frivolous Fashion Friday will have to wait until next week. Along with a few other things I wanted to share.

I'm hoping by Monday I'll be feeling all better. I HATE being sick!! I guess I can't complain too much, it's been a year since I was last sick. Tomorrow night I'm hosting our Dinner Club night. I can't wait!! It's soo much fun! I'll tell you all about it next week. Promise.  =)  Oh, and you might have noticed there's a new sponsor there on my sidebar, Rockin Bowstars.


They make super cute bows, clips, headbands, etc. I'll introduce you to them, and tell you about a little giveaway we have planned for you all. I'm soooo excited for my first giveaway!!!

Anyhoo, have a great weekend.  : )

Saturday, October 8, 2011

Sweet Potato Soup

Hey There.  =)  The other day I had absolutely no idea what I was going to make for dinner. While enjoying my afternoon cup of tea I thought I'd watch a little of the Food Network. LOVE!! I was watching Chef at Home with Michael Smith and he started rattling off ingredients to make sweet potato soup. It sounded delish! And it just so happened that I had every ingredient he listed. How often does that happen? Umm, never! So that's what I made (with a few of my own additions) and boy was it good. I also baked up some Pillsbury crescents to go with it. Of course, me always having to Dr. things up, I brushed the tops with some melted butter and honey while they were baking. Mmm, they were sweet, tasty and went perfectly with the soup.

Sorry for the poor photo quality. It was dark outside and impossible to get a decent pic. 
I took about 12 and this was the best. It was even brightened up in Picnik

Here's Michael's recipe
Sweet Potato Soup
yields 4 servings
  • 2 tablespoons olive oil
  • 2 onions, peeled and chopped
  • 2 carrots, peeled and chopped
  • 2 celery stalks, chopped
  • 1 large sweet potato, or 2 small, peeled and cut into small chunks
  • 2-3 cups chicken broth
  • 1 tablespoon cinnamon
  • Sprinkled sea salt and freshly ground black pepper, to taste

Directions

  1. Place a saucepan or soup pot over medium heat and add the oil. When it begins to get hot, add the onions, carrots and celery and sauté until softened and fully aromatized.
  2. Add the sweet potatoes and enough broth to completely cover all the vegetables. Season with cinnamon, salt and pepper and bring to a simmer.
  3. Cook until potatoes are very soft and then puree with a hand blender, food processor or countertop blender until smooth. You may also serve the soup ‘as is. Taste and add more seasoning if need be.
My additions to the soup were as follows:
2 tsp brown sugar 
1 heaping tbs Indian Masala seasoning (I used Club House brand.) 
Also, I only used 1 onion and only added about 1 tsp of cinnamon. 

This soup was ready in no time. Try it and let me know what you think. 

Happy Thanksgiving to my Canadian readers!! 
Sharing With:

100!!

Happy Saturday all. For me it really is a happy Saturday. I woke up this morning to a shiny, round, three digit number in the sidebar of my little blog. That number said 100!!! Thank you to each and every one of you for coming back. It really makes me smile to read a lovely comment from you. And I know there are a bazillion blogs out there, thank you for choosing to read mine!!! You truly have made my day!


I have been thinking of doing a giveaway once I reached 100. I wish I could just run out and buy a lovely gift and ship it off to each of you, but times are a little tight right now and may be getting tighter, so I'm trying to think up something crafty. If any of you out there would like to donate something towards a giveaway, that would be greatly appreciated and please be in touch. As for today, have a great one. I certainly will!! Again, thank you!  =)
** Just for the record, I don't like the term followers. It sounds kind of cultish and weird. I consider you my blogland buddies! 

Thursday, October 6, 2011

Oatmeal Cookies

A couple weeks ago I made up a batch of oatmeal cookies that I've been meaning to share with you. Things have come up and I haven't really had a chance to get the post written. I'm finally get around to it today. These cookies are from a Nestle Toll House recipe. I have a great book by them that's all cookies and bars. The pictures get your mouth watering.


Oatmeal Cookies
Makes 4 dozen
  • 1 1/1 cup flour
  • 1 tsp baking soda
  • 1/2 tsp salt
  • 1/2 tsp cinnamon
  • 1 cup butter, softened 
  • 3/4 cup sugar
  • 3/4 cup brown sugar
  • 2 eggs
  • 1 tsp vanilla
  • 3 cups quick or old-fashioned oats

1. Combine flour, baking soda, salt and cinnamon in small bowl. Beat butter, sugar, brown sugar, eggs and vanilla in large mixing bowl until creamy. Gradually beat in flour mixture. Stir in oats. Drop by rounded spoonfuls onto ungreased baking sheets. 
2.  Bake in preheated 375 degree oven for 7 to 8 minutes for chewy cookies or 9 to 10 minutes for crispy cookies. Let stand for 2 minutes; remove to wire racks to cool completely. Makes about 4 dozen cookies. 
** I bake mine for about 9 minutes and they turn our crispy on the edges and chewy in the middle. 

 Happy baking!! 

Sharing With:

Monday, October 3, 2011

Halloween Wreath


Just a quick post today to show off my Halloween wreath I made over the weekend. It was super easy, super quick and super cheap. Just how I like it! First I started with a piece of pipe insulation. Yep, the stuff you put around your pipes so they don't freeze. We have quite a bit around our house. When Miss A was learning how to walk Mr. CC, being the worry wart that he is, put the stuff on a few of the corners of our walls. You know, just in case she walked into them. I have to admit, they have saved a few bumps and bruises over the years. Anyway, I took one, cut off about 8 to 10 inches, wrapped it into a wreath shape and taped it together. Like this.

Of course I forgot to take pictures of the actual assembly of the wreath, so you get the pic I pinned. Easy, huh? After that I took the 6 ft. garland I got at the Dollarama and wrapped it around. To secure the garland to the wreath I used a dollop of hot glue on each end. At the top I left about three inches exposed. That part I wrapped with some cute Halloween ribbon, added a bow and some extra to hang it with. Last year I bought a "Happy Halloween" sign for the door, I hot glued it to the bottom of the wreath. Now it's all one piece. Here's how she turned out.


This is how it looks at night with the porch light on. It's soo sparkly!! 

How do ya like my $2 wreath? The only things I bought were the garland and ribbon, both a buck each. I think it's soo cute and love the little black bats against the purple. Saturday the girls and I put up our Halloween decorations. We don't have very many, so it didn't take long. Have you started decorating for Halloween?

Here in Canada Thanksgiving is this weekend. We don't do a turkey. Me being American, I do Thanksgiving in November. Some years we go to friend's or family for turkey dinner. But I find it's not as big a holiday here as it is in the States and not as many people celebrate it. Don't know why? Personally, it's my favorite holiday. It's all about be thankful, good food, good company and none of the pressure or greed of presents. That's my kind of holiday!!
Sharing With:


Sunday, October 2, 2011

Not What I Intended

So today's post is one I wasn't originally intending to do. I thought I'd write this post later in the week, as I like to share a baking recipe on Sunday's, but things didn't turn out as well as I had anticipated. If you follow me of facebook, you would have seen the little peek I posted about these delicious looking "Impossible Pumpkin Pie Cupcakes" that I found on Pinterest. The pictures looked sooo good and I LOVE pumpkin pie! Of course I was thinking, I must make them. Everything went smoothly while I was making them and the batter was very tasty. I made them in the morning and they were for dessert last night. And I actually did not have a bite of one until then. Oh, I really wanted to, but I had some self-control.  : )

Just before dinner I whipped up some whipped cream and piped it onto the tops of them. They looked sooo good! Then came the shot where I wanted to show the inside of one. This meant I had to finally take a bite. I used a fork and couldn't wait for the fork to hit my mouth. Only, it wasn't all I was hoping for. It was, sadly, kind of tasteless.  : (  All my waiting had been for this?? Ahh, man! I thought after all my work I might as well tell you about it and share the link to the recipe. If I did make them again I would up the spice amount and possibly add a 1/4 cup more sugar. Just goes to show things don't always work out like we plan.

Doesn't it look soo yummy?  : (

The recipe I am sharing is one of my own, it's very tasty and quick to make. 
Now please keep in mind that I don't really measure when I cook. So, I'm not quite sure 
about exact amounts, but I'll try my best for ya. 

Tomato & Feta Pasta
4 - 6 tomatoes, chopped and seeded
1 red pepper
1/2 red onion 
2 cloves minced garlic
1 cup or to taste, diced feta
salt & pepper to taste
Enough cooked pasta to feed your family. 
I used spaghetti, but you could use
whatever kind you want. 

1. Cook your pasta. I'm pretty sure I don't need to tell you how to do this.  : )  
2. Chop all the veggies and cheese. 
3. Add some oil to a large fry pan, enough to coat the bottom. Saute pepper, onions and garlic. Once the onions are a bit translucent add the tomatoes. Cook for a minute or two longer, then add the cheese. Cook an additional minute or two. 
4. Toss with pasta and salt and pepper to taste. That's it!! Enjoy! 


The cooking time for this dish is as long it takes to boil water and cook the pasta. That's what, maybe 20 minutes? I had leftover pasta on hand and it took me about 10 minutes to make. I love a quick dinner fix. This would be a great recipe if you do Meatless Monday at your house. If you'd like some meat in it, just add diced chicken. I've done that before and it's delish!! Please share if you try this. 
Sharing With:


Related Posts Plugin for WordPress, Blogger...