Background

Showing posts with label Halloween. Show all posts

Sunday, October 30, 2011

Candy Corn Sugar Cookies

Happy Sunday all! I'm here with another baking recipe for ya. I came across a picture of these cookies on Pinterest (shocker!) and knew I had to make them. They are perfect for Halloween - candy corn sugar cookies. I have to say, these are by far, the cutest cookies I've ever seen! I love candy corn and it just makes me smile to see a candy corn cookie.  =)


See, cute! I bet you're smiling now too. Now I will admit these cookies were a bit labor intensive. You see I don't have a Kitchen Aid mixer or any stand-up mixer for that matter. Which meant I had to mix in the coloring by hand. I thought my shoulder was going to need ice yesterday afternoon. For reals! My right shoulder was aching while I stirred in the yellow and then the red food coloring. If you have a mixer these will be so easy for you to make. Here's a look at the process.


After my dough was made I divided it into thirds. The first third I left white and put into a plastic wrap lined loaf pan. See picture above. I patted it as flat as I could. Then I mixed the yellow dye into the remaining two thirds and added half of the yellow to the pan. The last of the yellow dough got some red coloring mixed in to turn it orange. Oh, by this point I was ready to quite! It seemed like it took forever to get that dough orange enough. But I suffered through and the middle pic above is what the dough looked like all flattened together.

I let it chill in the fridge for about 6 or 7 hours. You could let it chill overnight if you wanted. I would recommend chilling it at least 4 hours. You want it to be nice and firm once you start slicing. Make your slices about 1/4". Then just angle your knife to cut out candy corn shapes. See picture above. That's all there is to it. Like I said, if you have a mixer this will be super easy.

Here's the best recipe I've found for sugar cookies. It's from All Recipes and makes soft and chewy cookies or you could bake them a couple minutes longer if you like yours crispier. 

Ingredients
1 1/2 cups butter, softened
2 cups white sugar
4 eggs
1 teaspoon vanilla extract
5 cups all-purpose flour
2 teaspoons baking powder
1 teaspoon salt

Directions

  1. In a large bowl, cream together butter and sugar until smooth. Beat in eggs and vanilla. Stir in the flour, baking powder, and salt. Cover, and chill dough for at least one hour (or overnight).
  2. Preheat oven to 400 degrees F (200 degrees C). Roll out dough on floured surface 1/4 to 1/2 inch thick. Cut into shapes with any cookie cutter. Place cookies 1 inch apart on ungreased cookie sheets.
   3.  Bake 6 to 8 minutes in preheated oven. Cool completely.

** FYI - I only made half a recipe. I got probably 100 or more candy corn cookies out of it. 

This morning while taking pictures of these little cuties, I thought you could easily use different colors in the dough and round out the pointy parts to make more of an egg shape for Easter cookies. I will definitely be doing that. Wouldn't they look great with pink, yellow and white? Or purple, white and blue? Or, you could color every dough third a different color and have green, yellow and pink eggs. Oh the possibilities are endless. Just try these for now.  : )

Sharing With:
The Pinterest Challenge at Bower Power & Young House Love

Saturday, October 29, 2011

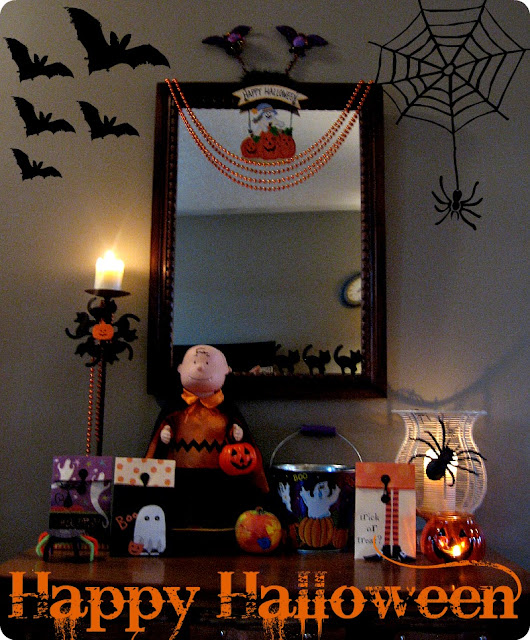
Halloween in da House

Happy Halloween weekend!! 
Hope you're all have a good one. Any partyin' going on?   

I realized last night that I hadn't showed you the Halloween 
decorations I'd put up the first weekend of October. I 
don't do a lot of decorating. I shared the Halloween 
wreath I made for our front door here
Other than that, I hang pumpkin lights in the front window
and our entryway gets a little decorated. 
Have a peek.  

The bats and spider web were added in 
Picnik. I had lots of fun editing the 
pics for this post.  : )  

Don't you love the lightening? Very cool!! 

I like how the candle light cast shadows of the little 
spiders on the wall. Oooohhh...

I just love Charlie Brown and the Great Pumpkin. Reminds
me of being a kid. I've had Charlie here for 12 years. 
When you push the button on the base he dances to the Charlie
Brown theme song. Very cute! 

These are the cutest goodie bags I've ever seen. I found them at Winner's last year. 

That's it. Told ya I don't decorate much. It's cute though. 
I know lots of people love the evil gory stuff 
at Halloween, but not me. I like the cute little
ghosts and pumpkins. 

Have a very happy and safe rest of the weekend! I'll
be back tomorrow to share the cutest cookies
ever made. I know that's a pretty 
big claim, but after you see them I'm sure
you'll agree. If you follow me on facebook you've
already seen a sneak peek.  : )  Hmm, maybe
you should head on over and follow me on facebook
to check them out. 

Sharing With:

Monday, October 3, 2011

Halloween Wreath


Just a quick post today to show off my Halloween wreath I made over the weekend. It was super easy, super quick and super cheap. Just how I like it! First I started with a piece of pipe insulation. Yep, the stuff you put around your pipes so they don't freeze. We have quite a bit around our house. When Miss A was learning how to walk Mr. CC, being the worry wart that he is, put the stuff on a few of the corners of our walls. You know, just in case she walked into them. I have to admit, they have saved a few bumps and bruises over the years. Anyway, I took one, cut off about 8 to 10 inches, wrapped it into a wreath shape and taped it together. Like this.

Of course I forgot to take pictures of the actual assembly of the wreath, so you get the pic I pinned. Easy, huh? After that I took the 6 ft. garland I got at the Dollarama and wrapped it around. To secure the garland to the wreath I used a dollop of hot glue on each end. At the top I left about three inches exposed. That part I wrapped with some cute Halloween ribbon, added a bow and some extra to hang it with. Last year I bought a "Happy Halloween" sign for the door, I hot glued it to the bottom of the wreath. Now it's all one piece. Here's how she turned out.


This is how it looks at night with the porch light on. It's soo sparkly!! 

How do ya like my $2 wreath? The only things I bought were the garland and ribbon, both a buck each. I think it's soo cute and love the little black bats against the purple. Saturday the girls and I put up our Halloween decorations. We don't have very many, so it didn't take long. Have you started decorating for Halloween?

Here in Canada Thanksgiving is this weekend. We don't do a turkey. Me being American, I do Thanksgiving in November. Some years we go to friend's or family for turkey dinner. But I find it's not as big a holiday here as it is in the States and not as many people celebrate it. Don't know why? Personally, it's my favorite holiday. It's all about be thankful, good food, good company and none of the pressure or greed of presents. That's my kind of holiday!!
Sharing With:


Related Posts Plugin for WordPress, Blogger...